What is Git?

Git is a distributed version control system (DVCS) used for tracking changes in source code during software development. It was created by Linus Torvalds in 2005 as a replacement for the proprietary BitKeeper system that was previously used for managing the development of the Linux kernel.
Git also provides several features that enable efficient collaboration, such as branching and merging, which allow developers to work on different features or versions of the code in parallel and then combine their changes seamlessly.
What is Github:

GitHub is a web-based hosting service for software development projects that use the Git version control system. It was launched in 2008 and has since become one of the largest code repositories in the world.
GitHub provides a platform for developers to store and share their code with others, collaborate on projects, and contribute to open-source software. It also offers a range of tools and features that enable developers to track issues, manage projects, and review code changes.
What is Version Control? How many types of version controls we have?

There are three main types of version control systems:
Local Version Control Systems: These systems store revisions of files on a local machine, and typically use a simple database to manage the changes. Examples include the RCS (Revision Control System) and SCCS (Source Code Control System).
Centralized Version Control Systems: These systems store revisions of files on a central server, which acts as a single point of truth for the codebase. Developers can check out files from the server, make changes, and then check them back in. Examples include CVS (Concurrent Versions System) and Subversion.
Distributed Version Control Systems: These systems store revisions of files on multiple machines, and allow developers to work on the same codebase independently, without relying on a central server. Changes are synchronized between machines using a peer-to-peer network. Examples include Git and Mercurial.
Why do we use distributed version control over centralized version control?
There are several advantages to using a distributed version control system (DVCS) like Git over a centralized version control system (CVCS) like Subversion. Here are some of the key reasons:
Offline Work: With a DVCS like Git, developers can work on their codebase and make changes even when they are offline or disconnected from the network. This is because the entire repository is stored locally on their machine, rather than relying on a central server. This allows for greater flexibility and productivity.
Collaboration: DVCS systems make it easier for developers to collaborate on the same codebase. Because each developer has their own copy of the repository, they can work on different features or branches without interfering with each other's work. This reduces the risk of conflicts and makes it easier to manage complex projects with many contributors.
Branching and Merging: DVCS systems like Git make it easy to create branches and merge them back into the main codebase. This allows for greater flexibility in managing multiple versions of the code, testing out new features without affecting the main codebase, and collaborating on specific parts of the project without affecting the rest.
yum install git -y

Step-2 Check Git and its Version:

Step-3 Configure Username and Email id
 git config --global user.name <name>
 git config --global user.email <Email.id>

Step-4 Checking details:
git config --list

Step-5 Create Account on Git hub :

Define Workspace, Staging area and repositories in Git:
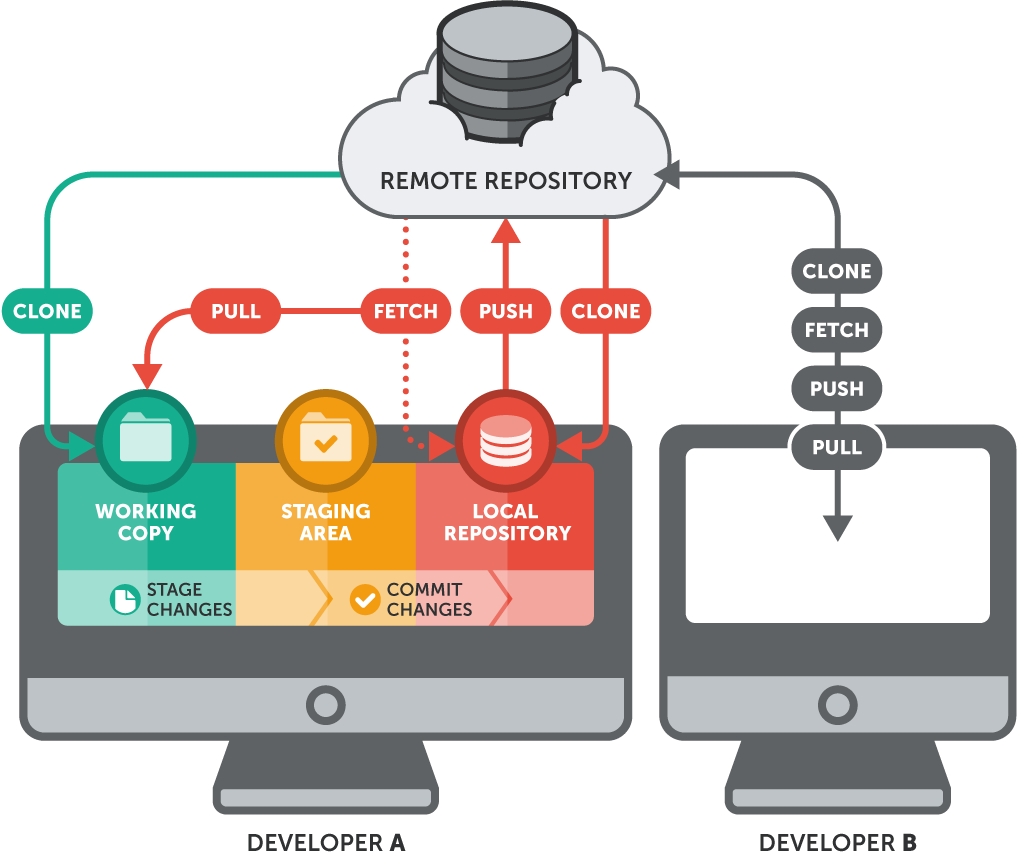
Workspace: The workspace, also known as the working directory, is the directory on your local machine where you make changes to your files. This is the place where you modify, create, or delete files as you work on your project.
Staging Area: The staging area, also known as the index, is an intermediate step between the workspace and the repository. When you make changes to your files in the workspace, you can add them to the staging area to prepare them for committing. The staging area allows you to review and select the changes you want to commit and exclude any changes that you don't want to commit.
Repository: A repository is a place where Git stores the history of your project. It contains all the versions of your files and their complete change history. You can have multiple repositories for a project, including local repositories on your machine and remote repositories on servers.
Step-1 Create a Directory and Initializes it :
git init
git init <name of directory>  , if you are not in working directory

Step-2 Create a file and add it to the staging area:
either add particular files by giving file names or add all files using .
touch shubham
git add ./<file name>
Step-3 Now if your file is ready to commit, you can see the status as well.
git status
Before git add command:

After git add command:

Step-4 You can see here this file is now ready to commit. so just commit it :
2 ways for this to do:
1st :
git commit -m "Your message"
2nd :
git commit
then an editor will popup -> Click i for insert mode in the editor -> put your commit message -> then to exit from editor, click Esc then :wq!
: to enter the command mode (we are telling a command to editor)
w for saving the work you wrote (w short form for write)
q to quit the editor
! do each process forcefully -> overrides any warnings if exists

Output :

Now if you again check Git Status it will blank because there is no file left to commit
git status

Step-5 Just add the central repository here so that you can push your file in Central repo:
At first just copy the link of your central repo on Github account:

Execute command:
git remote add origin <https link>

Step-6 Now try to push it into central repo:
git push -u origin master
git push -u <branch name>  , if you are in branch

It will ask for username and password just go to Github account and create token and use it for both username and password:

go to <setting> than <developer setting>


Generate classic token :

Give token the repo address, add token as the user name and password and congrats it's your first push to the repository :)

Now you can check it onto your Git hub Account:

To pull it from github use following command:
git pull origin master
Note: At present we are on master so we are using origin master, now what if we create a branch and then try to push it into github let's see:
Creating Branch :

In Git, a branch is a lightweight movable pointer to a commit. Branches are used to create a separate line of development, allowing changes to be made to a codebase without affecting the main codebase until the changes have been tested and merged.
Creating a new branch in Git is a quick and easy process. When you create a new branch, you essentially create a new pointer to the current commit that you are working on. You can then make changes to the codebase, and all of those changes will be made on the new branch.
Branch Creation:
git branch <branch name>

Oops But still you are on the master branch!
To enter into branch which you have created and to check where you are at present:
git checkout <branch name>
git branch

Ohh nice, we learnt how to switch branches...
Now create a file in it and add it to commit:

Now just try to push my new branch into Central Repository:
git push -u origin <branch name>


You can now see it in your Github Account 😄
Please follow me for more Topics on Git , We will cover
Git Conflict
Git Stashing
Git Revert and much more
Thanks for reading :)
Shubham Jangale